


Creating an Approval System with Power Automate
You can read more about the problems that we face when gathering approvals in the lesson article All about Approvals. This article went further and described the scenario we all face when gathering approvals and laid out in general terms what the ideal system would look like. Here we will take this general description of the ideal system and show you how to make it using specific tools: SharePoint and Microsoft Power Automate.
I use these tools because they are freely available to me to use in my job through the Office 365 license my company provides for me. I use the tools available to me. To be clear here, I use the resources provided to me by my employer when doing work for my employer. When creating tutorials like this I do not use my employer's Office 365 license. Microsoft provides free trial licenses for developers that are designed specifically for people like me who are trying to educate others how to use these tools. I describe below further how to get a free trial developer license. I could have also built this using my other coding skills, but I like to use SharePoint and Power Automate because they offer low coding features and the basic structures for handling data and building automations are already there. No need to start from scratch if I can just use these tools. And plus this is a tutorial for normal people who don't necessarily have deep coding skills to get an introduction into how to automate your work.
If you work for a company with Microsoft Office 365 licenses, chances are good that you already have access to SharePoint and Power Automate. If not, you can sign up for a free trial license at https://docs.microsoft.com/en-us/powerapps/maker/developer-plan. Don't know whether you have a license to use Power Automate? Go to https://flow.microsoft.com and try logging in.
The first thing we need to do is to make a space on a SharePoint where our user will go to interact with our Approval tool as a stand-alone tool. Quick note: we will also code this tool so that other systems can "hook" into it, but we'll discuss that much later. For now, if you work in a company, then all your SharePoints will follow this URL pattern:
https://mycompany.sharepoint.com/sites/mydepartmentorproject. You may already have a SharePoint where you want to put this. If not, you need to create one or ask your IT department to create one for you. I am going to use the example URL https://mycompany.sharepoint.com/sites/mydepartmentorproject for this tutorial. I must be an owner of the SharePoint and Modern Script Editor must be turned on. You can check whether Modern Script Editor is turned on by going to your SharePoint, clicking on the "gear" in the top-right corner, and selecting "Site Contents". Click on "+New" > App. In the search box, type "Modern Script Editor" and press Enter. Below you see that for me it found no apps that I can add. That's because Modern Script Editor has already been added. You will need to see the same or add it if you can. If you see nothing available, your IT department will need to turn it on for you so you can use it.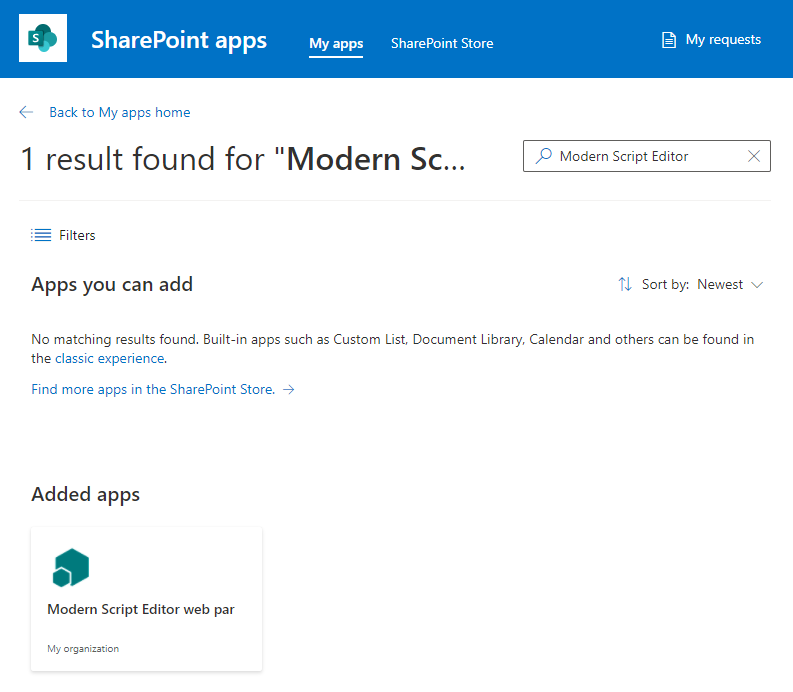
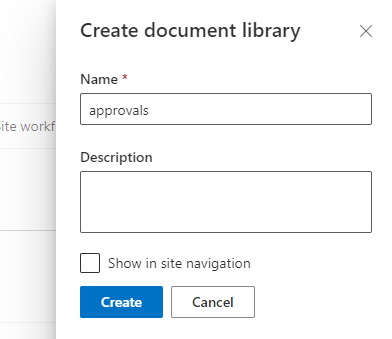
Next, we need to create a Document Library for our Approval system. We go back to the Site Contents and click "+New" again. Only this time we select "Document library". The name will be the name of a folder created and users will never see it directly, so I just call it "approvals". No description is needed since nobody will ever see it. And do not show it in site navigation. Click "Create".
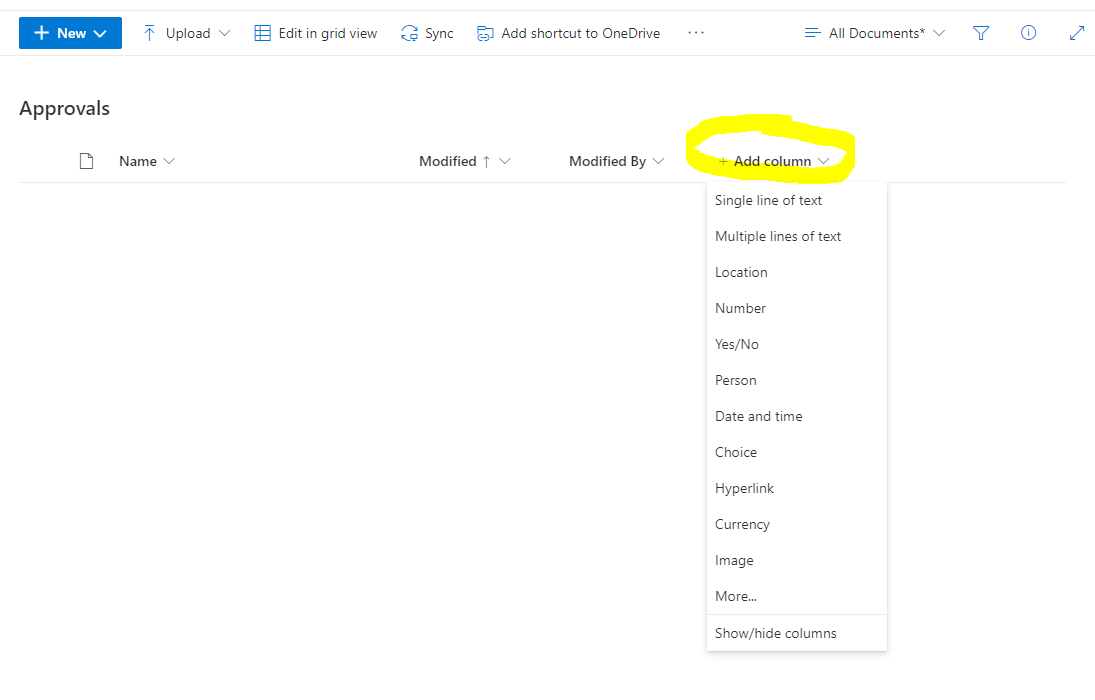
Now when you look at your Site Contents you'll see your "approvals" document library listed. Click on it to go into it. Again, your users will never see this view of the back end of your document library. You now have a folder where you can put files and a tree of folders. Each file and folder is technically an item in your document library. This works like a tree of folders like you're used to working with. But it also gives you the ability to add columns of meta data. The available data types for columns of meta data are shown below.
You will need to create the following columns for this project:
- Message: Multiple lines of text
- Createdby: Single line of text
- Createddatestring: Single line of text
- Createddate: Date
- Status: Single line of text
- Datesentout: Date
- Mytitle: Single line of text
- Datecomplated: Date
- Datecompletedstring: Single line of text
There are two general ways to organize data. One is in a tree of folders. Each level of folders is named in such a way to describe the data within it. Like you might have a tree of folders containing receipts. You'll have a level of folders with the years 2020, 2021, 2022. You're assigning meta data by putting a receipt into the right folder. You might even have sub-folders in each folder to give even more categories of meta data. Perhaps categories like "groceries, utilities, entertainment, house, car". Within each of those you might have a level of folders with the vendor's name. You will need to be very disciplined and have the folders be labeled the exact same across all the year folders. You may be able to keep this discipline if you are the only person working in the tree of folders. It becomes more difficult when you have more people working in the tree of folders and other people have different ideas about how the tree structure should look. Another problem is that you might have an item that could go into multiple folders. Like where would a receipt for a restaurant go? Is that groceries or entertainment? Or both? If you decide to put it in multiple folders and then you need to update the file in the future, you will need to go and update all versions of it in all the folders where it is located. We can see that this system of using a tree of folders has its disadvantages. The one huge advantage it does have is that you can easily store files in a folder.
The second general way to organize data is in a spreadsheet. Now you can have a line in the spreadsheet for each of your receipts. Instead of folders assigning meta data you can have a "Year" column and simply type into the cell 2020, 2021, or 2022. If you need to be able to assign multiple categories to a receipt, don't just have a "Category" column where you type in the column. Instead, have columns that say groceries, utilities, entertainment, house, and car. Now you can type in a "X" in each cell for each category that applies. So now you can assign multiple categories to a receipt. If you need to update an item, you update only its one line. A group of people can now easily assign meta data to items consistently. The disadvantage? How do you store the receipts in a spreadsheet? You can technically do it in Excel, but once you attach a lot of files, it will become slow to use. How can we get the advantages of both a tree of folders and a spreadsheet?
This is where the Document Library in SharePoint comes in. It gives you the advantages of both. You can create columns of meta data that describe the items in your tree of folders. And you can save files in the folders. You have both a database and a tree of folders at the same time.
Another thing a Document Library gives you is a URL on your SharePoint. My document library is at
https://mycompany.sharepoint.com/sites/mydepartmentorproject/approvals. Right now if I go to that URL I'll see the regular SharePoint interface. I don't want my users interacting with SharePoint. I want to give them the exact interface that I want to create and present to them. So I will create a file in my document library and name it <code>default.aspx. You can do this by goint to your Site Contents. Go to your document library. And click "Upload". You must already have a file called <code>default.aspx on your local computer. You can easily create it in Notepad. Create a new file in Notepad and give it some test content like: Test. Then save it as <code>default.aspx and upload it to the document library. Now when you go to https://mycompany.sharepoint.com/sites/mydepartmentorproject/approvals it will show yout the contents of your <code>default.aspx file, a blank web page with the word "Test".At this point you could continue to edit your <code>default.aspx file on your computer and then upload it to the SharePoint everytime you want to update it. I prefer not to work in this way. Instead I connect my SharePoint as a drive on my laptop. You can do this in two way. If you still have Internet Explorer (not Edge), you can visit your Site Contents in Internet Explorer. Then go to your document library in the normal SharePoint interface. Click on "All documents" in the top-right corner. Because you are in Internet Explorer there is now an option to "View in file explorer". Clicking on this starts a process of pop-up windows. You might have to allow pop-ups. In the end, your File Explorer will show you the contents of your SharePoint. The location bar will say
https://mycompany.sharepoint.com/sites/mydepartmentorproject/approvals.At this point, I would go to my left side panel in File Explorer and right-click on "Quick access" and select "Pin current folder to Quick access". This will put your folder in the left navigation panel so you can easily get to it later. You can now create files (like <code>defaults.aspx) or open existing files and edit them just as if it was a local file on your laptop. This is the way that I prefer to work with my HTML pages. This does not save any files on your local laptop. You work directly in the cloud on SharePoint.
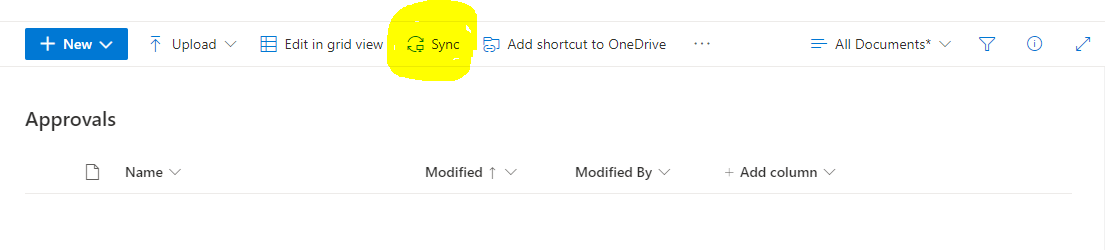
Another way to map the contents of your SharePoint onto your laptop is to "Sync" the document library. The "Sync" button is shown in SharePoint in the top bar when looking at your document library. This will also add your SharePoint to your left navigation in File Explorer, but a little further down with a kind of icon next to it, usually a building. The advantage to syncing is that it doesn't require Internet Explorer, which is now already a 10-year old browser that will be sunsetted in the future. Another advantage is that files you work with will have a version stored on your laptop. So that if you are somewhere with no internet access, you can still access and work on your files. The problem, though, is that now potentially you have a huge amount of files being stored on your laptop (the entire SharePoint) and if you and a colleague both don't have Internet access and both work on the same files, when you come back into internet access your files will try to sync with the SharePoint and there may be a version conflict. SharePoint deals with this by saving two version of the same file with a unqiue string added to the name of the file. You may have a problem reconciling these different versions. This is why I prefer to use the first method.
Now that we have the groundwork laid for how to set up our SharePoint, how to create the document library to use it as both a database and a tree of folders, and we have our home page created and we have a way to comfortably edit it like any other file on our laptop, let's show you how our project will look in the end.
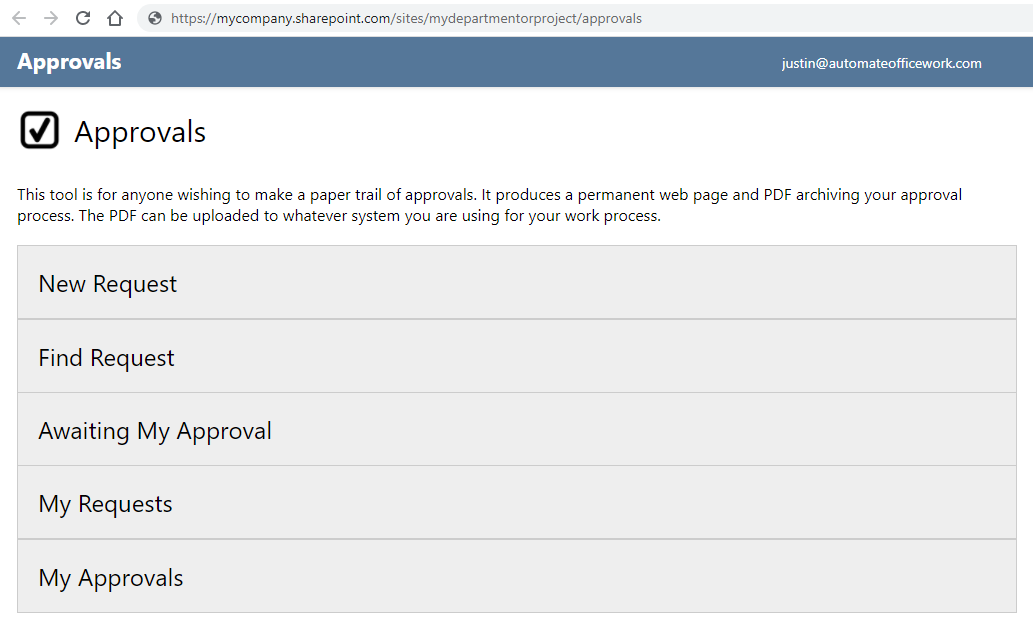
As a stand-alone tool it will have a home page shown above. The user can create a new request, find an existing request, see the list of requests awaiting their approval, see the list of all requests they have created and see the list of all requests where they have been an approver.
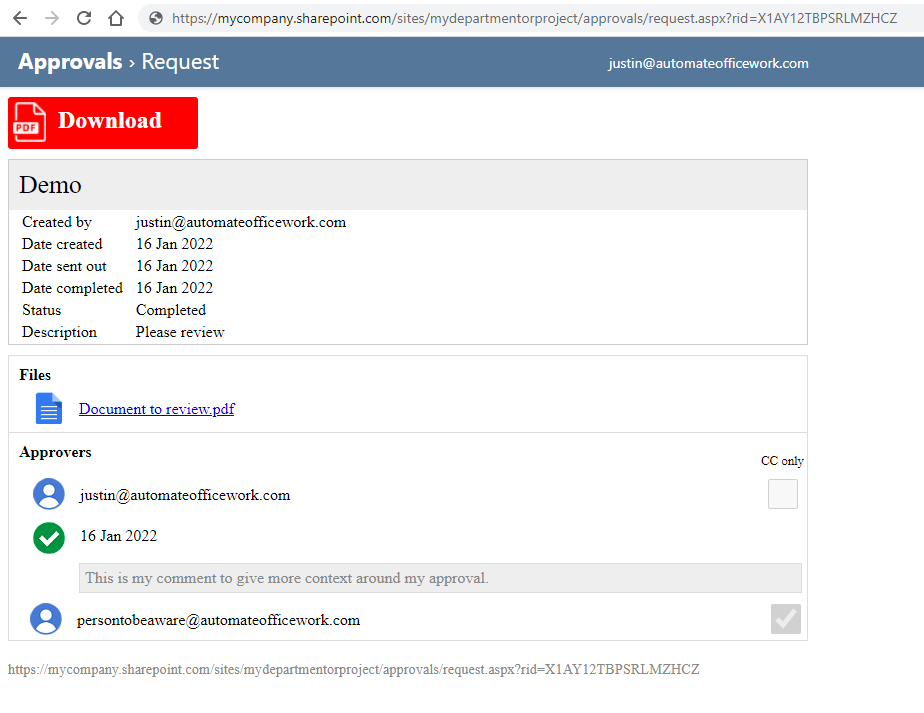
When an approval flow is done its archive page looks like above. We see all the details of the approval flow. It has a unique ID in the URL that is very difficult to guess. But once you have that URL, everything is read only. The approval flow has a title and a description. You can see the status of it. You can see the list of files that were attached. When you click on a file, a copy is downloaded to your local hard drive to open. Thus it is impossible to make changes to the attached files and change the archive. You can also see who the approvers were and whether they approved or rejected and optional comments. This flow also has a person who was "CC'd only". This person did not approve or reject, but was notified when the approval flow began and ended. The unique URL is also shown at the bottom of the page. There is also a "Download" button at the top to download a PDF that looks exactly like this page below the Download button, including the unique URL back to this page. Thus this PDF can be uploaded to whatever other system is lacking an approval module and an auditor could easily come to this page to review the approval flow and the files that were attached.
Building the home page
So back to the <code>default.aspx file. You can use the below HTML to make your <code>default.aspx look like the home page I showed in the screenshot above.
<html>
    <head>
        <title>Approvals</title>
        <script src="/sites/mydepartmentorproject/jquery/jquery.min.js"></script>
        <style>
            body{
                margin:0;
                min-width:700px;
            }
            #header{
                background-color:#579;
                box-shadow:0px 0px 5px rgba(0,0,0,.2);
                width:100%;
            }
            #headerbody{
                min-height:50px;
                max-height:50px;
                overflow:hidden;
                width:100%;
                max-width:1000px;
                font-size:22px;
                font-family:"Segoe UI", "Segoe UI Web (West European)", "Segoe UI", -apple-system, BlinkMacSystemFont, Roboto, "Helvetica Neue", sans-serif;
                border-collapse:collapse;
                border-spacing:0;
                border:none;
                table-layout:fixed;
            }
            #headerbody td{
                padding-left:0;
                padding-right:0;
                color:#fff;
            }
            #headerbody td:not(#breadcrumbcell){
                vertical-align:middle;
            }
            #headerbody a{
                color:#fff;
                text-decoration:none;
            }
            #headerbody a:hover{
                background-color:rgba(0,0,0,.1);
            }
            #breadcrumbcell{
                vertical-align:top;
                padding-top:8px;
                padding-left:20px;
                overflow:hidden;
                max-height:50px;
                overflow:hidden;
                white-space:nowrap;
                text-overflow:ellipsis;
            }
            #emailaddress{
                text-align:right;
                font-size:14px;
                padding-right:15px !important;
                overflow:hidden;
                width:200px;
                color:#fff;
            }
            #page{
                margin:10px;
                max-width:1000px;
                padding:10px;
                font-family:"Segoe UI", "Segoe UI Web (West European)", "Segoe UI", -apple-system, BlinkMacSystemFont, Roboto, "Helvetica Neue", sans-serif;
            }
            #homebuttons{
                width:100%;
                border-collapse:collapse;
            }
            #homebuttons tr{
                border:1px solid #ccc;
            }
            #homebuttons a{
                color:#000;
                text-decoration:none;
                padding:10px;
                display:inline-block;
                width:100%;
                height:100%;
            }
            .homebutton{
                background-color:#eee;
                padding:0px;
                font-size:1.5em;
                cursor:pointer;
            }
            .homebutton:hover{
                background-color:#ccc;
            }
            .homebutton a{
                color:#000;
                text-decoration:none;
            }
        </style>
        <script type="text/javascript">
            $(document).ready(function(){
                $.ajax({
                    url: "/sites/mydepartmentorproject/_api/web/currentuser?select=Email",
                    headers: {
                        "Accept":"application/json; odata=nometadata"
                    }
                }).done(function(data) {
                    $('#emailaddress').html(data.Email.toLowerCase());
                }).fail(function(error){
                    console.log(JSON.stringify(error));
                });
            });
        </script>
    </head>
    <body>
        <div id="header">
            <table id="headerbody">
                <tbody>
                    <tr>
                        <td id="breadcrumbcell">Approvals</td>
                        <td id="emailaddress"></td>
                    </tr>
                </tbody>
            </table>
        </div>
        <div id="page">
            <table style="width:100%;">
                <tbody>
                    <tr>
                        <td style="width:40px;">
                            <img src="/sites/mydepartmentorproject/images/approvals.png" title="Approvals" style="width:40px;">
                        </td>
                        <td>
                            <span style="font-size:30px;margin-left:10px;">
                                Approvals
                            </span>
                        </td>
                    </tr>
                </tbody>
            </table>

            <div style="margin-top:30px;margin-bottom:20px;">
                This tool is for anyone wishing to make a paper trail of approvals. It produces a permanent web page and PDF archiving your approval process. The PDF can be uploaded to whatever system you are using for your work process.
            </div>
            <table id="homebuttons">
                <tr>
                    <td>
                        <a href="newrequest.aspx">New Request</a>
                    </td>
                    <td><a href="">Find Request</a></td>
                    <td><a href="">Awaiting My Approval</a></td>
                    <td><a href="">My Requests</a></td>
                    <td><a href="">My Requests</a></td>
                </tr>
            </table>
        </div>
    </body>
</html>
I will explain some of the basics for those of you who have never worked with HTML, CSS or JavaScript before. HTML is the basic structure of your page. It's like the frame of a house. It defines the rooms that exist in your house and how they relate to each other. CSS is then all about the style, the look and feel of your page. It gives the exact dimensions of your rooms down to the pixel if you want and it gives the colors of your walls and the texture of your floors. JavaScript then makes your page interactive. It makes it so you can click a button and something happens. JavaScript has also matured a lot over the years and become the way to retrieve and update data from databases. So you will use it to personalize your page for the current user who is logged in.
I should note that on line 4 we are importing a JavaScript library that I use called jQuery. It is extremely powerful and extends JavaScript even further. I have gotten a copy and uploaded it locally to my document library in a folder called "jquery". Starting on line 5 I declare my CSS style for the various elements on the page. We tell it exactly how big and what colors and fonts the various things should be.
The next interesting part is on line 96 where we start our JavaScript. If you just start using plain JavaScript it will begin firing before your HTML page has loaded. We will be filling in the current user's email address into the top right corner of the page, but we need for the page to load before we can do this. jQuery provides a simple way for us to wait for everything to load first. This is the
$(document).ready() function. jQuery waits for the entire page to load and then it firest any JavaScript within this function. Within this function we see an AJAX call.$.ajax({
url: "/sites/mydepartmentorproject/_api/web/currentuser?select=Email",
headers: {
"Accept":"application/json; odata=nometadata"
}
}).done(function(data) {
$('#emailaddress').html(data.Email.toLowerCase());
}).fail(function(error){
console.log(JSON.stringify(error));
});Websites until the early 2000's were an all or nothing kind of affair. If you wanted to get a little bit of data you had to refresh the entire webpage. JavaScript's AJAX calls changed this. Standing for Asynchronous JavaScript and XML, it's a set of tools and techniques that allows us to get a small amount of data and then update a small portion of the website. In the AJAX call above we are getting data from the URL. In the headers we indicate that we want to get the data in JSON format.
The URL is interesting. It's a SharePoint URL that allows you to get data. API is a standard acronym for Application Programming Interface. It allows us to interact with the SharePoint through URL's and not just mouse clicks and key strokes. If you visit the URL you will see a page like below.
<?xml version="1.0" encoding="utf-8"?>
<entry xml:base="https://mycompany.sharepoint.com/sites/mydepartmentorproject/_api/" xmlns="http://www.w3.org/2005/Atom" xmlns:d="http://schemas.microsoft.com/ado/2007/08/dataservices" xmlns:m="http://schemas.microsoft.com/ado/2007/08/dataservices/metadata" xmlns:georss="http://www.georss.org/georss" xmlns:gml="http://www.opengis.net/gml">
    <id>https://mycompany.sharepoint.com/sites/mydepartmentorproject/_api/Web/GetUserById(1)</id>
    <category term="SP.User" scheme="http://schemas.microsoft.com/ado/2007/08/dataservices/scheme" />
    <link rel="edit" href="Web/GetUserById(1)" />
    <title />
    <updated>2022-01-20T09:52:35Z</updated>
    <author>
        <name />
    </author>
    <content type="application/xml">
        <m:properties>
            <d:Email>justin@automateofficework.com</d:Email>
        </m:properties>
    </content>
</entry>
The data above comes from a web browsher so we cannot change the header data to indicate which format we want to receive the data in. The above data is in XML format.
In our AJAX function in the
.done() portion you see that we are taking the returned data and putting it into a variable called "data". If we were to do a console.log(JSON.stringify(data)) you would see the below in the developer's panel of the browser.{
"Id": 1,
"IsHiddenInUI": false,
"LoginName": "i:0#.f|membership|justin@automateofficework.com",
"Title": "Justin",
"PrincipalType": 1,
"Email": "justin@automateofficework.com",
"Expiration": "",
"IsEmailAuthenticationGuestUser": false,
"IsShareByEmailGuestUser": false,
"IsSiteAdmin": true,
"UserId": {
"NameId": "123305037b05c2a3",
"NameIdIssuer": "urn:federation:microsoftonline"
},
"UserPrincipalName": "justin@automateofficework.com"
}This "data" variable is a data object. We can access the Email element within it by accessing
data.Email.We have an HTML element with the ID "emailaddress". We want to take the email address of the current user visiting our SharePoint page and we want to insert that into the "emailaddress" HTML element. We can do this with the jQuery function
.html(). First we have to select the element whose HTML we want to update. We can select the element with the ID "emailaddress" by using the jQuery selector $("#emailaddress"). At the end of this we append the .html() function. Inside the html() function we put the new HTML that we wish to insert into the element. We can use the variable data.Email that we received from the SharePoint API. This inserts the email address of the current user into the top-rigth corner of the page.
For the list of buttons we use an HTML table. It's a simple way to make a series of rows with the class
.homebutton. We can then use CSS styling to style the look and feel of these table rows. Insisde the table cell we place a link that expands and takes up all the space in the cell. CSS styling is also used to change the look and feel of these table rows when we hover over them. We change the background color. When the user clicks on the "New Request" button they go to <code>newrequest.aspx.Building <code>newrequest.aspx
The user will only be on this page very briefly and then immediately redirected to <code>request.aspx with a unique ID. <code>newrequest.aspx</code merely generates the new unique ID and creates a record in our document library. Here is the contents of <code>newrequest.aspx.
<html>
    <head>
        <title>New approval</title>
        <script src="/sites/mydepartmentorproject/jquery/jquery.min.js"></script>
        <script type='text/javascript'>
            $.ajax({
                url: "/sites/mydepartmentorproject/_api/web/currentuser?select=Email",
                headers: {
                    "Accept":"application/json; odata=nometadata"
                }
            }).done(function(email) {
                var creator, title, createddate, createddatestring;
                title = (Math.random().toString(36).substring(2, 15) + Math.random().toString(36).substring(2, 15)).toUpperCase();
                creator = email.Email.toLowerCase();
                today = new Date();
                var day = ("0"+today.getUTCDate().toString()).slice(-2);
                var month = ("0"+(today.getUTCMonth()+1).toString()).slice(-2);
                var year = today.getUTCFullYear().toString();
                var months = ["","Jan","Feb","Mar","Apr","May","Jun","Jul","Aug","Sep","Oct","Nov","Dec"];
                var d = today;
                createddate = parseInt(day)+' '+months[parseInt(month)]+' '+year;
                createddatestring = year+month+day;
                $.ajax({
                    //Send an HTTP request to SharePoint 565a; create item
                    url: "https://prod-121.westus.logic.azure.com:443/workflows/565af31042d94c7bacbe0ee62c35eebd/triggers/manual/paths/invoke?api-version=2016-06-01&sp=%2Ftriggers%2Fmanual%2Frun&sv=1.0&sig=Y6-TZHHzRfAHLcgydSGGlmCG3W-zdeyYEYLV2Ay-LA4",
                    method: 'POST',
                    headers: {
                        "Content-Type": "application/json;odata=verbose",
                        "Accept": "application/json;odata=verbose"
                    },
                    data: JSON.stringify({
                        siteaddress:"https://mycompany.sharepoint.com/sites/mydepartmentorproject",
                        method:"POST",
                        uri: "/_vti_bin/ListData.svc/Approvals",
                        headers:{
                            "Content-type":"application/json; odata=nometadata",
                            "Accept":"application/json; odata=nometadata",
                            "Slug":"https://mycompany.sharepoint.com/sites/mydepartmentorproject/approvals/"+title+"|0x0120"
                        },
                        body: JSON.stringify({
                            Name: title,
                            Path: "https://mycompany.sharepoint.com/sites/mydepartmentorproject/approvals/"+title
                        }),
                        responseheaders:{
                            "Content-type":"application/json"
                        }
                    })
                }).done(function(requestdata){
                    $.ajax({
                        //Send an HTTP request to SharePoint 565a;
                        url: "https://prod-121.westus.logic.azure.com:443/workflows/565af31042d94c7bacbe0ee62c35eebd/triggers/manual/paths/invoke?api-version=2016-06-01&sp=%2Ftriggers%2Fmanual%2Frun&sv=1.0&sig=Y6-TZHHzRfAHLcgydSGGlmCG3W-zdeyYEYLV2Ay-LA4",
                        method: 'POST',
                        headers: {
                            "Content-Type": "application/json;odata=verbose",
                            "Accept": "application/json;odata=verbose"
                        },
                        data: JSON.stringify({
                            siteaddress:"https://mycompany.sharepoint.com/sites/mydepartmentorproject",
                            method:"POST",
                            uri: "_api/web/lists/GetByTitle('approvals')/items("+requestdata.d.Id+")",
                            headers:{
                                "Content-type":"application/json; odata=verbose",
                                "Accept":"application/json; odata=verbose",
                                "dataType":"json",
                                "X-HTTP-METHOD":"MERGE",
                                "IF-MATCH":"*"
                            },
                            body: JSON.stringify({
                                "__metadata": { "type": "SP.Data.ApprovalsItem" },
                                "Title" : title,
                                "Createdby" : creator,
                                "Createddate" : createddate,
                                "Createddatestring": createddatestring,
                                "Status" : "Inputs needed from requester"
                            }),
                            responseheaders:{
                                "Content-type":"application/json"
                            }
                        })
                    }).done(function(data){
                        window.location.href = "request.aspx?rid="+requestdata.d.Name;
                    }).fail(function(error){
                        console.log(JSON.stringify(error));
                    });
                }).fail(function(error){
                    console.log(JSON.stringify(error));
                });
            }).fail(function(error){
                console.log(JSON.stringify(error));
            });
        </script>
    </head>
    <body>
        <img src='/sites/mydepartmentorproject/images/fountain.gif' style='margin:20px;' />
    </body>
</html>
If we look at only the body of this HTML page it is a single image. It's an animated GIF of dots chasing each other to show the user that the page is working on something. You see at the beginning of the HTML page that we load jQuery like we did in <code>default.aspx. We also get the email address of the current user. After this, we nest our AJAX calls. We need to do this because if we do our AJAX calls in a linear way, AJAX works asynchronously, meaning it doesn't wait for one to end before starting the next. We have no way of knowing whether we have the email address if we go straight to creating a record for a new request where certainly we want to include the email address of the requester. So we nest the AJAX calls so that the next one only begins when the first one is done. The record of our new request requires a creator, title, createddate, and createddatestring. So we create these variables in JavaScript up front. We want a unique, random code to identify the record in its URL in the future (example: 0FQBOXR7287J3VQXMPQFNTY), so we generate this as our "title" variable. The JavaScript function Date() gives us the number of milliseconds since January 1, 1970. We can use this and further functions like .getFullUTCYear to get the current day, month and year. We then put these together into a long string like "25 1 2022". This will be saved in the createddate column with data type "Date". We will see it in our document library as 1/25/2022. This will be the date the request was created. I'm also in the habit of saving my dates as strings as well because sometimes manipulating and searching dates is impossible in some scenarios, but doing the same on a string is possible (like "20220125"). So I save my dates in both formats. For example, you can't search in the SharePoint API for an empty date column. But you can search for an empty string.
Next, things get a little more complicated. Now we want to send an AJAX call to the SharePoint API to create an item in our document library. If we go straight to doing this similar to how we got the email address of the current user, then the user would need to be authorized on our SharePoint to create items in our document library. For my case, they would need to be an owner of my SharePoint. Here is the paradox. I want my user to be able to create a new item in the document library, but I don't want them to even have view access of my document library in the SharePoint interface. Remember, we might have confidential files in some of these approval requests. So how do we give our user the exact access we want them to have, but only when we want them to have access?
This is where we use Microsoft Power Automate. It's free to use for many people who have Office 365 enterprise licenses. I recommend that you become acquainted with Power Automate, because it is an extremely powerful tool for not only connecting to everything in the Microsoft ecosystem, but you can expand it and connect it with many other sources of data and other applications. It will be our glue for allowing our user to manipulate data on SharePoint exactly how we want them to. Going to https://powerautomate.com redirects you to https://flow.microsoft.com.
Here you have an interface where you can do all kinds of things. You can find tutorials for getting started, you can create a new automation "flow" or see your existing flows. Click on "Create". You are asked what type of flow you will be creating. We will start from blank with an automated cloud flow. Next it asks you to name your flow and to choose a trigger from a list of the most popular triggers. I usually press the "Skip" button because I would rather see the full list of triggers. Click "Skip".

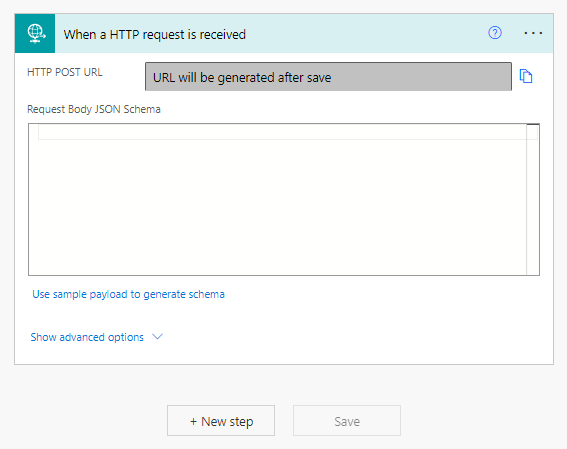
You now have a new empty untitled flow. The first thing you have to do is select your trigger. Every flow has to have a trigger. Your flow can be triggered by any number of events. The most popular are shown. You can search for connectors and triggers. A connector is a collection of triggers, usually for a specific proudct. For example, a connector would be Gmail. The trigger would be more specific, like "When Gmail receives a new email". Our trigger will be when the user makes an HTTP call to a URL. The connector is called HTTP. The trigger is "When a HTTP request is received".
Next we click the "+New step" button. Now you see a list of connectors and actions to choose from. We want the SharePoint connector. The action is "Send an HTTP request to SharePoint".
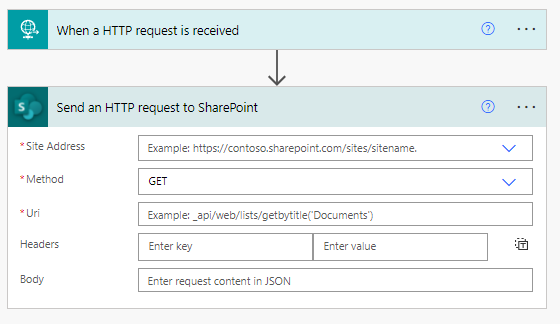
The trigger is now collapsed to not show you all the details so the screen is cleaner. You can always click on it to expand it again so you can see its details.
Now we need to fill in the required details for sending an HTTP request to SharePoint. These are marked with red asterisks. The first is the Site Address. This is the URL of your SharePoint like shown in the example. This is a drop-down menu where you select from the list of SharePoints that you have access to. At the very bottom is a "Custom" choice that you can select if you don't see your desired SharePoint and you can manually type in its address. I will select
https://mycompany.sharepoint.com/mydepartmentorproject.Next is the Method. Your options are
GET, POST, PUT, PATCH, and DELETE. Depending on the documentation of the API you are using to interact with the data, you will use different methods. The main ones I use are GET and POST. GET is used for just getting data from a server. POST is used when you want to send data to the server, perhaps to create a file or to update a file. Next is the Uri (another name for URL). Again, the documentation for the API you're using will give you the exact URL that you should be using. The Headers are so that you can tell the API in which format you would like to receive data back and your API documentaton may tell you to put a property/value pair here. The Body section is where we put the data we are sending to the server, like when using the POST method. The Body data must be in JSON format.For a quick demontration, I'll show how we get the email address of the user, just like we did previously, but this time with using Power Automate.
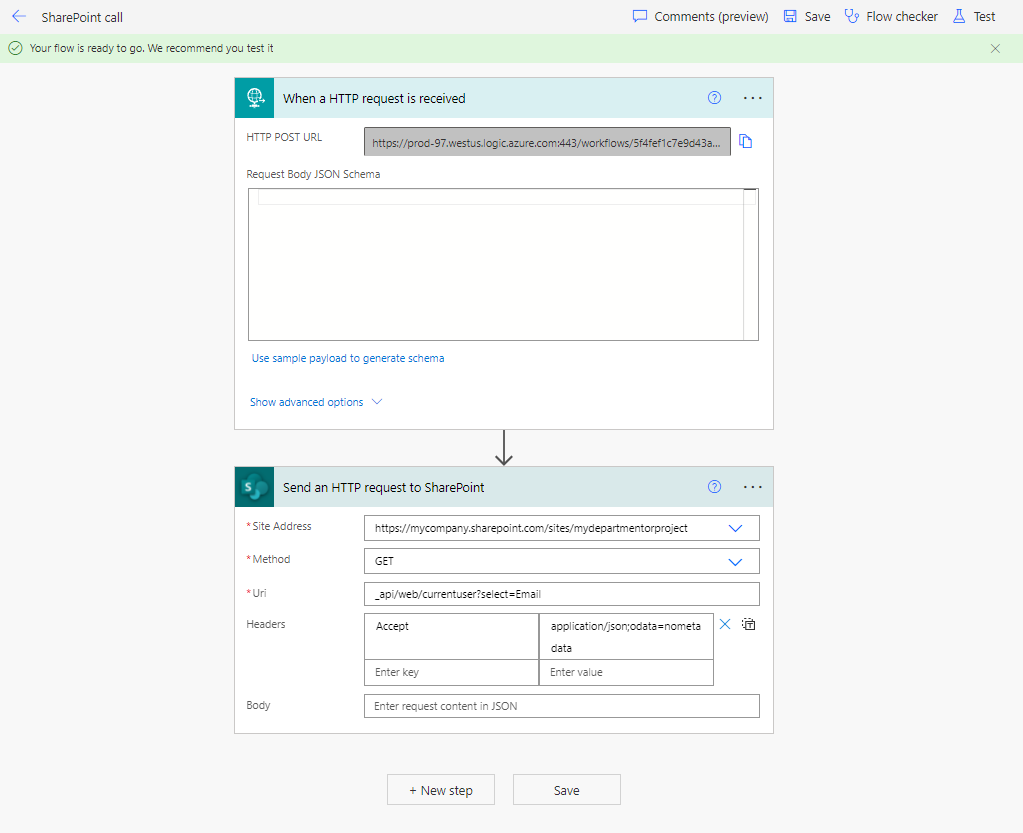
I filled in the details of the action like below. Now that we have a trigger and at least one action and the action has the minimum values filled in, I renamed our flow "SharePoint call" (by clicking on Untitled in the top left corner) and clicked the "Save" button in the top right. It then generated our unique URL for triggering this flow, which you can see in the details of the trigger when expanded. The URL is in a gray box and does not show the entire URL. You need to click the "copy" icon or select it and copy it to get the full URL. Copy this URL and go to the URL in a normal browser.
You should get an error:
{"error":{"code":"TriggerRequestMethodNotValid","message":"The HTTP method for this request is not valid: expected 'POST' and actual 'GET'."}}The SharePoint API expected that we use the
POST method, but we used the GET method in the action "Send an HTTP request to SharePoint". To change the method, in the action select POST from the Method drop-down menu. Save your flow, then refresh the webpage at the URL that was generated earlier. You should see a completely blank page. That's because the data is being transferred in a variable, not displayed on the screen. You would only see text on this screen if there was an error in your flow. To check how your flow ran, go back to Power Automate and in the top left-corner of your flow is an arrow pointing to the left. Click on it. You now see a history of every time this flow ran. The background is green if it was successful, red if it failed. Click on our green line. You now see a screen that looks similar to the editing page, but it's filled in with all the data that was being moved around at each step. Expand the SharePoint HTTP Request action and you can see the contents of the variable of data that we received back. You should see your own name and email address in there.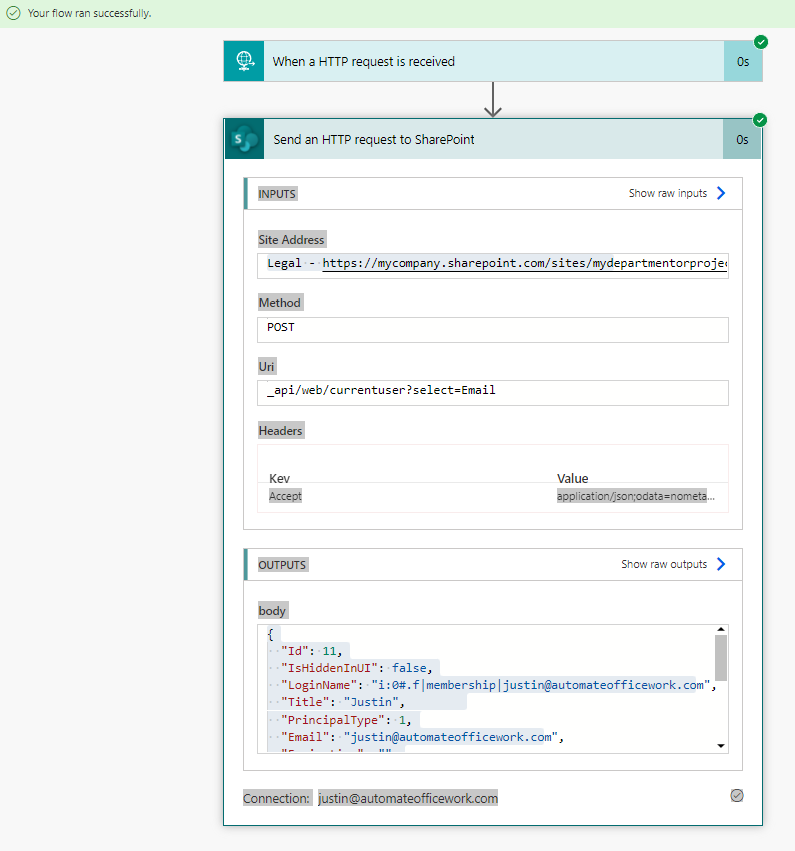
The interesting thing about using this URL that Power Automate generated, is that if you were to give this URL to somebody else and they went to it as a web page. When you check the run log, you would not see the other person's name and email address. You would see your own. Because Power Automate is accessing SharePoint on behalf of the author of the flow. This is huge. This is how we can give access to others to access SharePoint data using our access levels.
A word of caution here. You should be very careful using this power. You should narrow down your automation so that users are only able to do exactly what you want them to be able to do. Take comfort in knowing, that when you use this power on SharePoint pages, most company SharePoints can only be accessed by internal employees. If you want to take extra precautions, you can record in a log every time an action is taken. Yes, in the SharePoint logs it will appear that the flow author did the action, but in your custom made log you can record the real email address of the user who was logged in, along with the action they took and the new values they gave.
Back to <code>newrequest.aspx. We need to be able to let the current user create a new item in our document library. I have a flow whose unique URL starts with 565a. You can see it below. I like to name my flows with the first four characters of the generated URL. So in the browser if I see an error occured when calling that flow, I see the unique URL and I can go to Power Automate and search my (many) flows by searching for those four characters. Otherwise, its very difficult to remember the connection between the URL and what you named your flow.
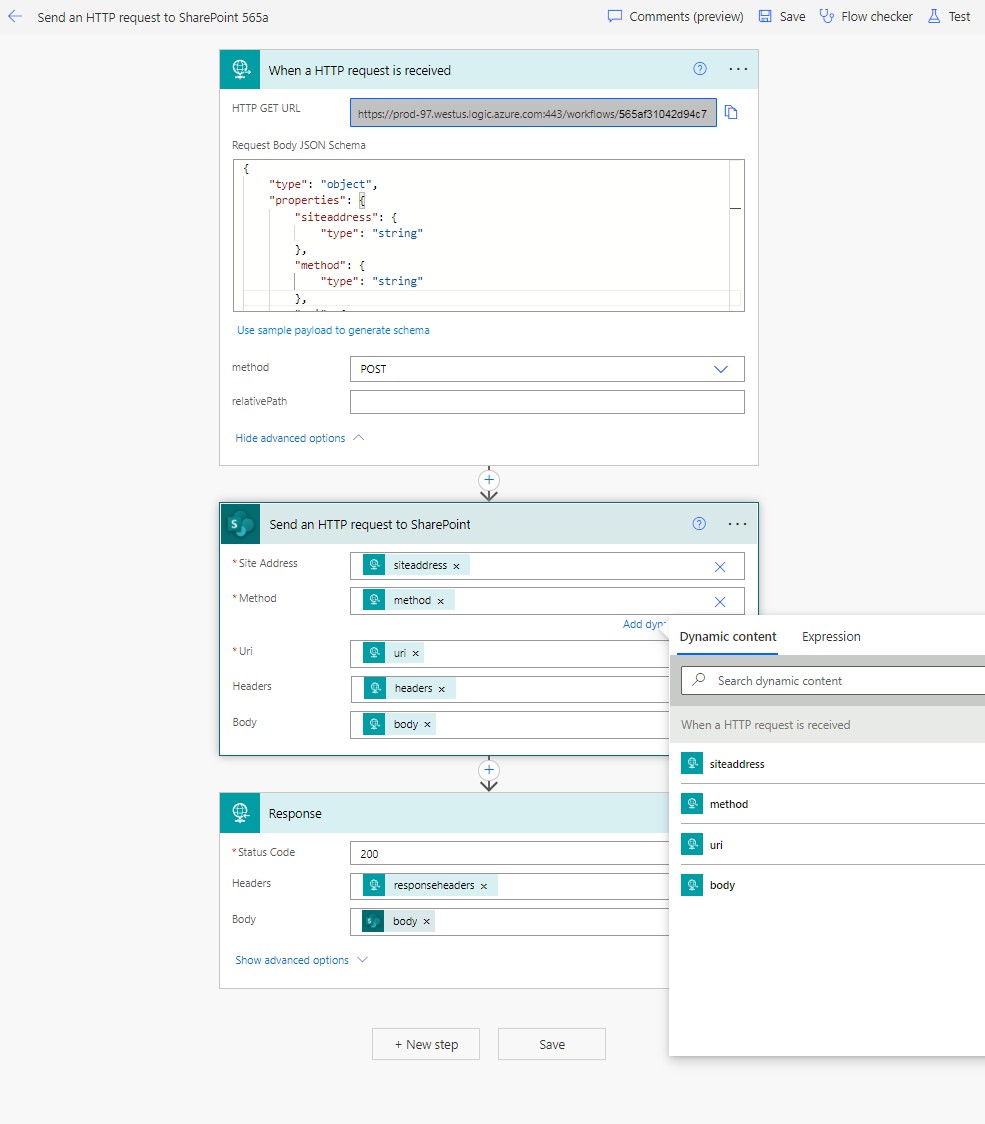
You see above I made the action to send an HTTP request to SharePoint very general. I'm filling in the details with variables. These variables have to be set up in the trigger in the Request Body JSON Schema. I give you my entire schema below:
{
    "type": "object",
    "properties": {
        "siteaddress": {
            "type": "string"
        },
        "method": {
            "type": "string"
        },
        "uri": {
            "type": "string"
        },
        "headers": {
            "type": "object"
        },
        "body": {
            "type": "object"
        },
        "responseheaders": {
            "type": "object"
        }
    }
}
Instead of typing in the schema directly, if you would prefer, you can click on the link to "Use sample payload to generate schema". You can type a sample of data that our <code>newrequest.aspx will be sending and the schema will be inferred from it. A sample is below:
{
    "siteaddress":"abc",
    "method":"abc",
    "uri":"abc",
    "headers":{},
    "body":{},
    "responseheaders:{}
}
This creates the necessary variables. We can then use them in our flow. In the text areas where the variables go, instead of typing in hardcoded values, click on "Add dynamic content". This opens a side panel like in the screen shot above that shows the variables that are available for you to insert. Insert the variables as needed. In the Headers section, click the icon to the right of the field to switch the field from a table to a single cell and insert our headers variable. Also, you need to switch the Method in the trigger to
POST since we are receiving data in the body of our AJAX call in <code>newrequest.aspx. More about that later.Below the Send an Http request to SharePoint action, click "+New step" and insert a "Response" action from the "HTTP" connector. In the Body section of this you want to choose the Body variable generated by the "Send an HTTP request to SharePoint" action. Just like we received the data about the current user in a simple call to the SharePoint API, this flow will return any data returned by this action.
Now we switch back to <code>newrequest.aspx where we have to get our AJAX call ready to call this flow and to pass all the necessary variables to it.
$.ajax({
    //Send an HTTP request to SharePoint 565a; create item
    url: "https://prod-121.westus.logic.azure.com:443/workflows/565af31042d94c7bacbe0ee62c35eebd/triggers/manual/paths/invoke?api-version=2016-06-01&sp=%2Ftriggers%2Fmanual%2Frun&sv=1.0&sig=Y6-TZHHzRfAHLcgydSGGlmCG3W-zdeyYEYLV2Ay-LA4",
    method: 'POST',
    headers: {
        "Content-Type": "application/json;odata=verbose",
        "Accept": "application/json;odata=verbose"
    },
    data: JSON.stringify({
        siteaddress:"https://mycompany.sharepoint.com/sites/mydepartmentorproject",
        method:"POST",
        uri: "/_vti_bin/ListData.svc/Approvals",
        headers:{
            "Content-type":"application/json; odata=nometadata",
            "Accept":"application/json; odata=nometadata",
            "Slug":"https://mycompany.sharepoint.com/sites/mydepartmentorproject/approvals/"+title+"|0x0120"
        },
        body: JSON.stringify({
            Name: title,
            Path: "https://mycompany.sharepoint.com/sites/mydepartmentorproject/approvals/"+title
        }),
        responseheaders:{
            "Content-type":"application/json"
        }
    })
}).done(function(requestdata){
    //................. I left out code here. We will discuss this code after our present discussion
});
As soon as this item is created, we will also have its unique numeric ID which we will use to manipulate the item further. After all, we have other variables that we need to assign to the meta data of the item, like the email address of the creator, the status, and the date it was created.
The data section is an object variable where we store all the variables we are passing to the flow. You see we define the siteaddress, method, uri, headers, body and reponseheaders variables that will be used by the flow. The uri
/_vti_bin/ListData.svc/Approvals is the URL provided by the SharePoint api for creating items in a document library. The headers are exactly how it should be written. We have to give in the "Slug" variable in the header the exact URL where we want the item to be created. Notice we are using the generated "title" variable as the title of this new item in the document library. The |0x0120 portion means that we are creating a folder, not a file. In the body variable we have an object that contains two more variables. These are the Name of our new item and its Path, both of which contain the same generated Title variable. In the end, we will get data back about our newly created document library item, which will be in the "requestdata" variable.Inside the
done() function of the previous AJAX call we start another AJAX call.$.ajax({
//Send an HTTP request to SharePoint 565a;
url: "https://prod-121.westus.logic.azure.com:443/workflows/565af31042d94c7bacbe0ee62c35eebd/triggers/manual/paths/invoke?api-version=2016-06-01&sp=%2Ftriggers%2Fmanual%2Frun&sv=1.0&sig=Y6-TZHHzRfAHLcgydSGGlmCG3W-zdeyYEYLV2Ay-LA4",
method: 'POST',
headers: {
"Content-Type": "application/json;odata=verbose",
"Accept": "application/json;odata=verbose"
},
data: JSON.stringify({
siteaddress:"https://mycompany.sharepoint.com/sites/mydepartmentorproject",
method:"POST",
uri: "_api/web/lists/GetByTitle('approvals')/items("+requestdata.d.Id+")",
headers:{
"Content-type":"application/json; odata=verbose",
"Accept":"application/json; odata=verbose",
"dataType":"json",
"X-HTTP-METHOD":"MERGE",
"IF-MATCH":"*"
},
body: JSON.stringify({
"__metadata": { "type": "SP.Data.ApprovalsItem" },
"Title" : title,
"Createdby" : creator,
"Createddate" : createddate,
"Createddatestring": createddatestring,
"Status" : "Inputs needed from requester"
}),
responseheaders:{
"Content-type":"application/json"
}
})
}).done(function(data){
window.location.href = "request.aspx?rid="+requestdata.d.Name;
}).fail(function(error){
console.log(JSON.stringify(error));
});This second AJAX call modifies the meta data of the item created in the previous one. To do this, we need to know the unique numeric ID of the item we created. This was passed to us in the response at the end of the previous AJAX call in the "requestdata" object variable. The unique numeric ID is at requestdata.d.Id. So our URL to update the item through the SharePoint API is
_api/web/lists/GetByTitle('approvals')/items("+requestdata.d.Id+"). The unique nueric ID goes into the items() portion. The headers are done just right to do the update of the meta data. And in the "body" variable we pass the names of the columns of meta data we are updating and their new values. Notice whenever you update an item in SharePoint you also have to pass a __metadata.type value. Here we are using SP.Data.ApprovalsItem because approvals is the name of our document library. If you ever need help finding this value for your specific situation, you can do a GET call to /_api/web/lists/getbytitle('nameofyourlistgoeshere'), even in a browser works for this. In the data returned look for the value starting with SP.Data and it shows you the value you should use to manipulate this document library or list.In the done() portion of the AJAX call we put JavaScript for what to do once the AJAX call is successful. Here we redirect the user's browser to
request.aspx?rid=123 where the "rid" value is the random, long, non-guessable string that we named the document library item.A note here about the
fail() portion of the AJAX call. This JavaScript is triggered if the AJAX call fails. You can use it to see errors in your browser's console instead of inspecting the failed run in Power Automate. I usually just do a quick console.log(JSON.stringify(error)) so I can quickly see the error. Common problems are the you are using the wrong Method, or a variable is not set up right. Perhaps you are sending a variable with conents 123 (an integer) when the flow is expecting a string ("123").You're now at a point where your user can see your home page and click to create a new request. They will see chasing dots for a second and then be redirected to see the <code>request.aspx page. A new folder will be added to your Approvals document library with the meta data columns updated properly. And your user will get a "Page not found" error because we haven't yet created <code>request.aspx.
To Be Continued... At the Link Below
That's it for setting up the SharePoint, creating the home page, the meta data columns to store our data, and creating the page that creates a new item in the document library through Power Automate. I'll end this article here and continue this project in the next article. You've probably learned enough for today, time to digest this information.
You now have the general basics for how to create amazing tools inside of SharePoint using Power Automate as the glue for data manipulation. You can use SharePoint as both your user interface and the database for documents and meta data. Really take in this lesson. Everything else will be just further details that build on this foundation to create more complex automations.
If you're new to coding and creating web pages and manipulating them, I recommend that you take a general beginner's course in HTML, CSS, JavaScript and just a little bit of jQuery to know the most basics. I also recommend you know the basics of JSON, a format for organizing data. It is now the defacto way to organize data for sending between applications. Don't worry about memorizing anything. Just get used to the vocabulary and you can always use Google when you get stuck in your own projects. I would also recommend that you get used to doing the most basic things in the SharePoint API. Two documents in particular: Working with folders and files with REST and Working with lists and list items with REST. When manipulating items in a SharePoint document library or list you can manipulate them like a tree of folders (folders and files) or as a items in a spreadsheet with columns of meta data (lists and list items).
A note about Power Automate's features. Most of them are free for anyone to use who has a normal license. Some of the features require an additional "Premium" license. The HTTP trigger and the Response action we used here both require a Premium license. If you get an error saying you don't have the required license, there should be a link nearby to sign up for a free trial license. In my experience, even when the trial runs out, you can simply sign up for the trial again. Ultimately, you'll need to structure your automation strategy in a way that works for you. A Premium license for a user is really an affordable cost, something like $20 per month. A small price to pay indeed if you are automating the work of many people. You would need to contact your Microsoft rep to discuss further.


