


How to make a CRUD website

Knowing how to make a static website is one thing. Learning how to make an interactive tool is really something else.
When I was in college 20 years ago, I took a class in web design. The very last day, the professor taught us how to make database-driven websites. And I was hooked.
I recently went to tour high schools with my son. We looked at the computer department syllabus. The kids are learning the exact same thing, making web sites driven by databases. And the funny thing is they are using the exact languages that I used 20 years ago, PHP and MySQL.
So today, I'll teach you (or your child!) how to do exactly that. But first we need to explain CRUD.
Any kind of useful information system does at least four things:
- C = Create
- R = Retrieve
- U = Update
- D = Delete
Think of any software or app that you use. A cookbook or schedule. You want to be able to create new information, retrieve it, modify it, and finally delete it. But a static web site doesn't do more than just retrieve static information. To get these extra functionalities we will need a database. And for a website to interact with a database you need more than just HTML.
I will give you a tutorial for a simple journal called "Code Time" for tracking time spent coding. This is the very first project I worked on with my son when he turned 12 years old to teach him the basics of CRUD. And now you can get the benefit from this same project.
A quick note why we will be using PHP and MySQL. Because they are open source and even though they are now going on 30 years old, almost 80% of websites still use PHP to some degree. It is a very easy language that is usable on many servers. So much so that you can even get a free server to use it.
Yes, technology has moved on to new ways of coding complex web pages, like React. But in my view, React is too difficult to teach someone who has zero coding knowledge. There is so much overhead that you have to learn first before doing the most basic thing. So therefore, I (and apparently today's high schools agree with me) promote teaching beginners a more basic language first, at least to learn the basics.
So with that behind us, let's get stared.
Getting started
The first thing we need is a server. You could make your own computer into a local server that only you can access from your machine. Or you could open it up and make your computer accessible from the Internet, which would also open you up to security threats. Instead, we're going to use a free online service that will give you free server space and a free domain. Head on over to https://www.infinityfree.com/. This is a free website hosting service that gives you some space to make websites and it has PHP and MySQL databases. Click the "Register" button and create an account. You'll then create a web site space which they call an "Account". This would allow you to have one username, but multiple web sites. So click to create an account and choose the $0 forever plan.
Next you choose your domain. You can select from a drop-down of standard domain names and you can type in your preferred subdomain name. Checking availability brings you to the next page with a form that is pre-filled in. You only have to select whether you give their vendors consent to email you. You don't need to remember your account password that is shown here. Just click "Create". Once everything is created you come to the final page. Click on the "Finish" button. You'll see a screen like below.

You should see something like the above web site manager. We will be using the File Manager (big orange button) to create our web page. And we will be using the MySQL Databases (in the bottom left corner of the screenshot) for managing databases.
My website is at aow.000.pe. If I go to that URL now it shows me a filler page with links to learn how to edit the page.
For now, we will click on the orange "File Manager" button.

File Manager
This first level of documents is settings for your website. You should not upload files here at this level for your website because they won't be viewable. Anything you want seen on your web site must be in the "htdocs" folder. Click on the folder to go into it.

The index2.html file is the file currently serving your home page. You can click on the file and you can do all kinds of actions to the file. Edit opens a simple text editor. Ultimately, you will want to delete this file. Along the bottom of this screen are buttons for uploading files to this location and a plus sign for creating new items. The items you can add are folders and files. One last thing here, clicking the orange up arrow takes you one level higher in the folder tree structure.
Now let's delete index2.html and create a new index.html file. Edit index.html and put in the below HTML. By the way, when you go to a website or a folder on a website, the server looks for a file called index.html to serve to you by default. It is the default page if the user doesn't specify a specific file.
<! DOCTYPE html>
<html>
    <head>
    <title>My Projects</title>
        <style>

        </style>
        <script>
        </script>
    </head>
    <body>
        <ul>
            <li><a href="codetime">Code Time</a></li>
        </ul>
    </body>
</html>
Now if you go to http://aow.000.pe you see the below web page. This page will be a list of all your future projects. Clicking on the link won't actually work because we haven't created the "codetime" folder yet.

Go back to the file manager and click the "Close" button in the bottom right corner of the editor and create a folder in "htdocs" called "codetime". Go into the new codetime folder. Create the below folder and files.

Go to http://aow.000.pe/codetime/images/codetime.svg and download the image. Then upload it in the images folder. This is the logo for the project. Then edit each php and html file and put in the below code.
index.html
<! DOCTYPE html>
<html>
    <head>
    <title>Code Time</title>
        <style>
            #header{
                background: rgb(255,255,255);
        background: linear-gradient(90deg, rgba(255,255,255,1) 0%, rgba(0,0,0,1) 100%);
                box-shadow: 0 0 15px rgba(0, 0, 0, .5); /* the "a" stands for alpha which means opacity (see-throughness). We are making a shadow that is located 0 from the top and 0 from the left and is 15px long. The color of the shadow is black, but it is half see-through so it's halfway between black and the color of things below the shadow.*/
                color:#fff;
                padding:10px;
                font-size:40px;
                font-weight:bold;
            }
            #header img{
                width: 500px;
                margin-right: 15px;
                vertical-align: middle;
            }
            body{
                font-family:segoe ui; /*This is a much nicer looking font*/
                margin:0;
            }
            button,input,textarea{
                padding:10px;
            }
            input,textarea{
                width:100%;
            }
            textarea{
                resize:vertical;
            }
            table{
                width:100%;
                max-width:700px;
            }
            #addhours{
                margin:15px 0 0 10px; /* top right bottom left */
            }
            #submitform{
                margin:0 0 10px 10px;
                background-color: #def;
                display:none;
                border:1px solid #79b;
            }
            #submitform td{
                padding:10px;
            }
            #submitform td:first-child{
                font-weight:bold;
                width:1px;

            }
            #hourstable{
                border-collapse:collapse;
                margin:10px;
            }
            #hourstable td{
                border: 1px solid #555;
                padding:10px;
            }
            #hourstable td:nth-child(1),#hourstable td:nth-child(3),#hourstable td:nth-child(5){
                width:1px;
            }
            #hourstable td:nth-child(2){
                width:90px;
            }
            #hourstable tr:first-child{
                background-color: #555;
                color: white;
                font-weight: bold;
            }
            #description{
                min-height:70px;
            }
            .deleterecord{
                padding:3px 5px;
                cursor:pointer;
                color:#aaa;
            }
            .deleterecord:hover{
                background-color:#fdd;
                color:#f00;
            }
            tr:not(.editable) .cancelbutton,tr:not(.editable) .savebutton,tr:not(.editable) .edithours,tr:not(.editable) .editdescription{
                display:none;
            }
            tr.editable .hours,tr.editable .description,tr.editable .editbutton{
                display:none;
            }
            .cancelbutton{
                margin-bottom:5px;
            }
        </style>
        <script>
            function makelinksclickable(){
                var elements = document.getElementsByClassName("deleterecord");
                for (var i = 0; i < elements.length; i++) {
                    elements[i].addEventListener('click', deleteFunction, false);
                }
                var elements = document.getElementsByClassName("editbutton");
                for (var i = 0; i < elements.length; i++) {
                    elements[i].addEventListener('click', editFunction, false);
                }
                var elements = document.getElementsByClassName("cancelbutton");
                for (var i = 0; i < elements.length; i++) {
                    elements[i].addEventListener('click', cancelFunction, false);
                }
                var elements = document.getElementsByClassName("savebutton");
                for (var i = 0; i < elements.length; i++) {
                    elements[i].addEventListener('click', saveFunction, false);
                }
            }
            function deleteFunction(){
                let id=this.closest('tr').getAttribute("rowid");
                let thisrow=this.closest('tr');
                var r=confirm("Do you really want to delete this record?");
                if(r){
                    let datatosend={};
                    datatosend.id=id;

                    let datastringified=JSON.stringify(datatosend);

                    fetch("delete_record.php", {
                        "headers": {
                            "content-type": "application/json"
                        },
                        "body": datastringified, // Use the stringified data here
                        "method": "POST"
                    }).then(response => response.json())
                    .then(data => {
                        // do whatever you want with the data
                        if(data.result=="success"){
                            thisrow.remove();
                        }
                    });
                }
            }
            function editFunction(){
                let row=this.closest('tr');
                row.classList.add('editable');
                row.querySelector('.edithours').value=row.querySelector('.hours').innerHTML;
                row.querySelector('.editdescription').value=row.querySelector('.description').innerHTML.replace(/<br>/g,"\n");
            }
            function cancelFunction(){
                let row=this.closest('tr');
                row.classList.remove('editable');
            }
            function saveFunction(){
                let savebutton=this;
                savebutton.disabled = true;
                let row=this.closest('tr');
                let id=row.getAttribute("rowid");
                let hours=row.querySelector(".edithours").value;
                let minutes=parseInt(hours.split(":")[0])*60 + parseInt(hours.split(":")[1]);
                let description=row.querySelector(".editdescription").value;
                let datatosend={};
                datatosend.id=id;
                datatosend.minutes=minutes;
                datatosend.description=description;
                let datastringified=JSON.stringify(datatosend);
                if(hours=="00:00"){
                    alert("Error. Hours cannot be blank.");
                    savebutton.disabled = false;
                    row.querySelector(".edithours").focus();
                }else{
                    fetch("update_record.php", {
                        "headers": {
                            "content-type": "application/json"
                        },
                        "body": datastringified, // Use the stringified data here
                        "method": "POST"
                    }).then(response => response.json())
                    .then(data => {
                        // do whatever you want with the data
                        if(data.result=="success"){
                            row.querySelector(".hours").innerHTML=hours;
                            row.querySelector(".description").innerHTML=description.replace(/\n/g,"<br>");
                        }
                        savebutton.disabled=false;
                        row.classList.remove("editable");
                    });
                }
            }
            let url="get_records.php";
            fetch(url,{method:"GET"})
                .then(Result => Result.json())
                .then(data => {
                    data.forEach(function(record){
                        var hours=(Math.floor(record.minutes / 60)).toString().padStart(2,'0') +":"+ (record.minutes % 60).toString().padStart(2,'0');
                        var tr=document.createElement("tr");
                        tr.setAttribute("rowid",record.id);
                        tr.innerHTML="<td><span class='deleterecord'>✖</span></td><td>"+nicedate(record.date)+"</td><td><span class='hours'>"+hours+"</span><input class='edithours' type='time' step='60' /></td><td><div class='description'>"+record.description.replace(/\n/g,"<br>")+"</div><textarea class='editdescription'><textarea></td><td><button class='editbutton'>Edit</button><button class='cancelbutton'>Cancel</button><button class='savebutton'>Save</button></td>";
                        document.querySelectorAll("#hourstable tbody")[0].append(tr);
                    });
                   makelinksclickable();
                })
                .catch(errorMsg => { console.log(errorMsg); });
                function nicedate(d){
                    var year=d.slice(0,4);
                    var months=["","Jan","Feb","Mar","Apr","May","Jun","Jul","Aug","Sep","Oct","Nov","Dec"];
                    var month=months[parseInt(d.slice(5,7))];
                    var day=d.slice(8,10);
                    return day+" "+month+" "+year;
                }
            window.onload=function(){
                var input=document.getElementById("hoursinput");
                input.addEventListener("keydown", function(event) {
                    if(event.key == 'Enter') {
                        document.getElementById("submithours").click();
                    }
                });
                input.addEventListener("input",function(event){
                    if(input.value<0){
                        input.value=0;
                    }
                    if(input.value>24){
                        input.value=24;
                    let n = num.toFixed(2);
                    }
                });
                document.getElementById('addhours').addEventListener("click",function(){
                    var x = document.getElementById('submitform');
                    if (x.style.display === "none" || x.style.display==="") {
                        x.style.display = "table";
                        document.getElementById("hoursinput").focus();
                    } else {
                        x.style.display = "none";
                    }
                });
                document.getElementById('submithours').addEventListener("click",function(){
                    document.getElementById("submithours").disabled = true;
                    let hours=document.getElementById("hoursinput").value;
                    let minutes=parseInt(hours.split(":")[0])*60 + parseInt(hours.split(":")[1]);
                    let description=document.getElementById("description").value;
                    console.log(minutes);
                    let datatosend={};
                    datatosend.minutes=minutes;
                    datatosend.description=description;
                    let datastringified=JSON.stringify(datatosend);
                    if(hours=="00:00"){
                        alert("Error. Hours cannot be blank.");
                        document.getElementById("submithours").disabled = false;
                        document.getElementById("hoursinput").focus();
                    }else{
                        fetch("add_record.php", {
                            "headers": {
                                "content-type": "application/json"
                            },
                            "body": datastringified, // Use the stringified data here
                            "method": "POST"
                        }).then(response => response.json())
                        .then(data => {
                            // do whatever you want with the data
                            if(data.result=="success"){
                                var row=document.getElementById("hourstable").insertRow(1);
                                row.setAttribute("rowid",data.id);
                                row.innerHTML="<td><span class='deleterecord'>✖</span></td><td>"+nicedate(data.date)+"</td><td><span class='hours'>"+hours+"</span><input class='edithours' type='time' step='60' /></td><td><div class='description'>"+description.replace(/\n/g,"<br>")+"</div><textarea class='editdescription'><textarea></td><td><button class='editbutton'>Edit</button><button class='cancelbutton'>Cancel</button><button class='savebutton'>Save</button></td>";
                            }
                            document.getElementById("hoursinput").value="00:00";
                            document.getElementById("description").value="";
                            document.getElementById("submithours").disabled = false;
                            document.getElementById("submitform").style.display="none";
                            makelinksclickable();
                        });
                    }
                });
            }
        </script>
    </head>
    <body>
        <div id="header"><img src='images/codetime.svg' /></div>
        <button id='addhours'>+Add</button>
        <table id='submitform'>
            <tr>
                <td>Hours</td>
                <td><input id='hoursinput' type='time' step='60' value='00:00'></td>
            </tr>
            <tr>
                <td>Description</td>
                <td><textarea id='description'><textarea></td>
            </tr>
            <tr>
                <td colspan='2'><button id='submithours'>Submit</button></td>
            </tr>
        </table>
        <table id='hourstable'><tr><td></td><td>Date</td><td>Hours</td><td>Description</td><td></td></tr></table>
    </body>
</html>
add_record.php
<?php
    $servername = "sql110.infinityfree.com";
    $username ="if0_37169177";
    $password = "*****************************";
    $dbname = "if0_37169177_hour_tracker";
    $conn = new mysqli($servername,$username,$password,$dbname);
    $postedData = json_decode(file_get_contents('php://input'), true);
    $stmt=mysqli_prepare($conn,"INSERT INTO coding_hours (date,minutes,description) VALUES(?,?,?)");
    mysqli_stmt_bind_param($stmt,"sss",$date,$minutes,$description);
    $minutes=$postedData['minutes'];
    $description=$postedData['description'];
    $date=gmdate("Y-m-d H:i:s");
    mysqli_stmt_execute($stmt);
    $last_id = $conn->insert_id;
    echo("{\"result\":\"success\",\"id\":\"".$last_id."\",\"date\":\"".$date."\"}");
    $conn->close()
?>
get_records.php
<?php
    $servername = "sql110.infinityfree.com";
    $username ="if0_37169177";
    $password = "*****************************";
    $dbname = "if0_37169177_hour_tracker";
    $conn = new mysqli($servername,$username,$password,$dbname);
    $array=[];
    $obj=(object)[];
    $sql = "SELECT * FROM coding_hours ORDER BY id DESC";
    $result=$conn->query($sql);
    while($row=$result->fetch_assoc()){
        $obj=array(
            "id"=>$row["id"],
                "date"=>$row["date"],
                "minutes"=>$row["minutes"],
                "description"=>$row["description"]
            );
            array_push($array,$obj);
    }
    echo json_encode($array);
    $conn->close()
?>
update_record.php
<?php
    $servername = "sql110.infinityfree.com";
    $username ="if0_37169177";
    $password = "*****************************";
    $dbname = "if0_37169177_hour_tracker";
    $conn = new mysqli($servername,$username,$password,$dbname);
    $postedData = json_decode(file_get_contents('php://input'), true);
    $stmt=mysqli_prepare($conn,"UPDATE coding_hours SET minutes=?,description=? WHERE id=?");
    mysqli_stmt_bind_param($stmt,"sss",$minutes,$description,$id);
    $minutes=$postedData['minutes'];
    $description=$postedData['description'];
    $id=$postedData['id'];
    mysqli_stmt_execute($stmt);
    echo("{\"result\":\"success\"}");
    $conn->close()
?>
delete_record.php
<?php
    $servername = "sql110.infinityfree.com";
    $username ="if0_37169177";
    $password = "*****************************";
    $dbname = "if0_37169177_hour_tracker";
    $conn = new mysqli($servername,$username,$password,$dbname);
    $postedData = json_decode(file_get_contents('php://input'), true);
    $stmt=mysqli_prepare($conn,"DELETE FROM coding_hours WHERE id=?");
    mysqli_stmt_bind_param($stmt,"s",$id);
    $id=$postedData['id'];
    mysqli_stmt_execute($stmt);
    echo("{\"result\":\"success\"}");
    $conn->close()
?>
Each of the PHP files has variables for $servername, $username, $password, and $dbname. Your variables will be unique to your account and so you must fill in your own data here. To get the data for these variables, go to your account home screen and click on "MySQL Databases".

My $servername is "sql110.infinityfree.com". $username is "if0_3716977". The $password is visible if I click the "Show/Hide" button. And my $dbname starts with "if0_37169177_". We need to create our database by clicking on the "+ Create Database" button below.

Type in "hour_tracker" and create the database.

You now have the hour_tracker database listed in your list of databases. Next click on the "phpMyAdmin" button to look at your database.

A database is made up of multiple tables. But our database has no tables yet. We need to create a table called "coding_hours".

Type in the below names for the four columns. By default the type is "INT" so for date change the type to "DATETIME" and description to "TEXT". We need to indicate one column as our unique identifier. So for the id column check the "A_I" checkbox. This stands for "automatically increment". When you select this box you'll get a popup asking if you want to make this column your primary index. Click "OK". Then click the "Save" button.

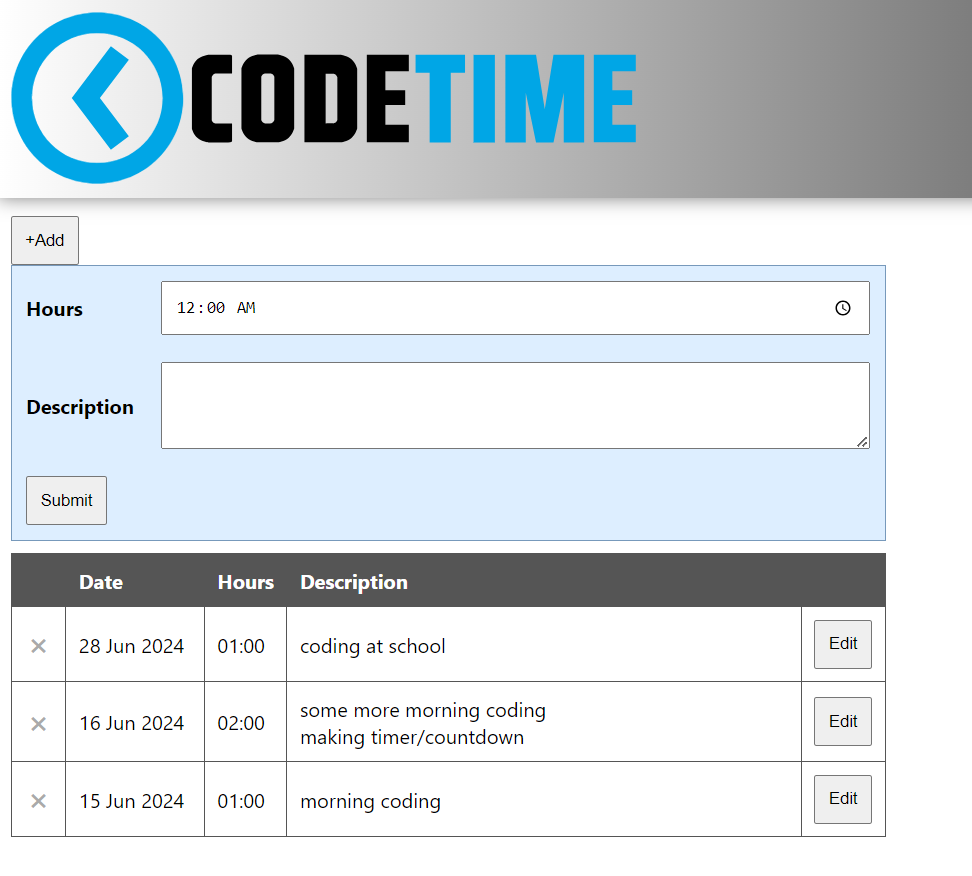
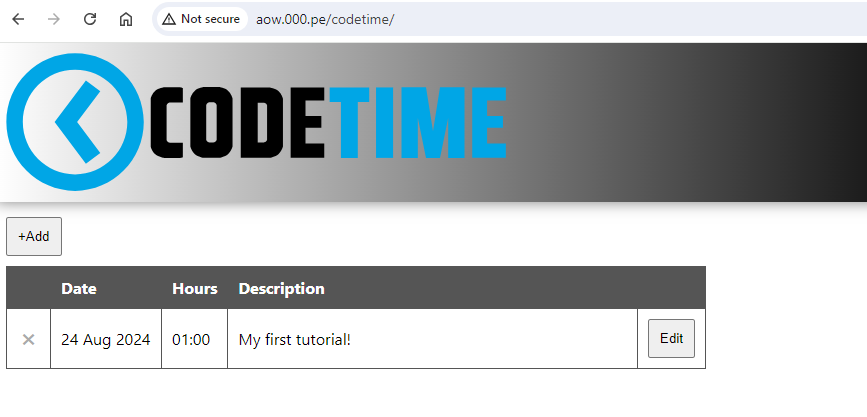
That's it! Now you can go to http://aow.000.pe/codetime and see your CRUD web site. Your list of times you coded is blank. So why not add one about how long you spent on this tutorial? For hours, I cheated and used a "time" input. It depends on how time is shown in your browser, midnight will either show for you as "12:00 AM" or "00:00". If you spent one hour, then set the time to "1:00 AM" or "01:00". For the description put "My first tutorial!" or some other description.

You did it! You saved your first data in your database-driven web page! If you don't like the look of it, you can always "Edit" the data and save it again. Or completely delete the row of data. You can also refresh the web page and you'll see your data displayed on the screen.
Explanation
Here's how all the code works. The browser first goes to index.html and displays the page. Web pages are made up of three things: HTML, CSS, and JavaScript.
HTML is like the walls of your house. It gives the basic structure. CSS is the styling, like the paint and wallpapers of the house. JavaScript makes everything interactive, like the doorknobs on your house that allow you to open and close doors.
HTML says that there is a banner at the top of your page with an image. Then a button. Then a table.
CSS sets the size of the image in the banner and we add a gradient background color to the banner. CSS says that the first row of our table should be almost black with bold, white letters.
JavaScript then determines what happens when we click on the buttons. JavaScript also retrieves the initial data for our table and fills in the rows of data.
OK. So let's look at index.html.
The first thing is that there are two main divisions of the file. The tag and the tag. Tags have closing and tags too. Inside the tag we put a tag. Everything inside there is our CSS which gives style to our page. Then after the CSS is the tag where all our JavaScript goes.
The main content of our web page, what we think of as the HTML of our page, goes in the tag. This is at the very end of our file and is really small.
<body>
    <div id="header"><img src='images/codetime.svg' /></div>
    <button id='addhours'>+Add</button>
    <table id='submitform'>
        <tr>
            <td>Hours</td>
            <td><input id='hoursinput' type='time' step='60' value='00:00'></td>
        </tr>
        <tr>
            <td>Description</td>
            <td><textarea id='description'><textarea></td>
        </tr>
        <tr>
            <td colspan='2'><button id='submithours'>Submit</button></td>
        </tr>
    </table>
    <table id='hourstable'><tr><td></td><td>Date</td><td>Hours</td><td>Description</td><td></td></tr></table>
</body>
How do we fill in the rows of the table with existing data from the database?
let url="get_records.php";
fetch(url,{method:"GET"})
    .then(Result => Result.json())
    .then(data => {
        console.log(data);
        data.forEach(function(record){
            var hours=(Math.floor(record.minutes / 60)).toString().padStart(2,'0') +":"+ (record.minutes % 60).toString().padStart(2,'0');
            var tr=document.createElement("tr");
            tr.setAttribute("rowid",record.id);
            tr.innerHTML="<td><span class='deleterecord'>✖</span></td><td>"+nicedate(record.date)+"</td><td><span class='hours'>"+hours+"</span><input class='edithours' type='time' step='60' /></td><td><div class='description'>"+record.description.replace(/\n/g,"<br>")+"</div><textarea class='editdescription'><textarea></td><td><button class='editbutton'>Edit</button><button class='cancelbutton'>Cancel</button><button class='savebutton'>Save</button></td>";
            document.querySelectorAll("#hourstable tbody")[0].append(tr);
        });
       makelinksclickable();
    })
    .catch(errorMsg => { console.log(errorMsg);
 });
This JavaScript code is run when the page loads. It makes a call to get_records.php and fetches any data from that web page. You can actually go to http://aow.000.pe/codetime/get_records.php and see the data that is generated which our web page then gets to process.

The PHP code from this file runs and fetches any data from our database table. It then prints this data to the screen in JSON format. Our JavaScript code then receives this data and can iterate through each row of data. It creates a new row of HTML for each one to be inserted into our table and update the web page. We then run a JavaScript function makelinksclickable() so that JavaScript will be listening for the clicking of these extra links and buttons that have been added to the web page.
Let's now look at the PHP file get_records.php.
<?php
    $servername = "sql110.infinityfree.com";
    $username ="if0_37169177";
    $password = "*****************************";
    $dbname = "if0_37169177_hour_tracker";
    $conn = new mysqli($servername,$username,$password,$dbname);
    $array=[];
    $obj=(object)[];
    $sql = "SELECT * FROM coding_hours ORDER BY id DESC";
    $result=$conn->query($sql);
    while($row=$result->fetch_assoc()){
        $obj=array(
            "id"=>$row["id"],
                "date"=>$row["date"],
                "minutes"=>$row["minutes"],
                "description"=>$row["description"]
            );
            array_push($array,$obj);
    }
    echo json_encode($array);
    $conn->close()
?>
Here we set a bunch of variables to connect to our database. We then connect to our database on Line 6 and we give that connection a variable name $conn so we can close it at the end when we no longer need it.
We then start an array variable in which we will store the rows of data retrieved. Our $sql variable is the query we will give to the database. We want it to get everything and order by the ID in descending order. So the newest ones will be first. Then $result tells our connection to run the database query and store the result in the $result variable. Then we use a while loop to iterate over the rows. For each row we add an $object row to our $array. "Echo" is PHP's command to print to the screen and we print the array encoded in JSON format. Finally we close the connection. This prints the data to our get_records.php web page. This is how our JavaScript gets the data from the database.
Passing data into the database is similar, but slightly different.
document.getElementById('submithours').addEventListener("click",function(){
    document.getElementById("submithours").disabled = true;
    let hours=document.getElementById("hoursinput").value;
    let minutes=parseInt(hours.split(":")[0])*60 + parseInt(hours.split(":")[1]);
    let description=document.getElementById("description").value;
    console.log(minutes);
    let datatosend={};
    datatosend.minutes=minutes;
    datatosend.description=description;
    let datastringified=JSON.stringify(datatosend);
    if(hours=="00:00"){
        alert("Error. Hours cannot be blank.");
        document.getElementById("submithours").disabled = false;
        document.getElementById("hoursinput").focus();
    else{
        fetch("add_record.php", {
            "headers": {
                     "content-type": "application/json"
                },
                "body": datastringified, // Use the stringified data here
                "method": "POST"
            }).then(response => response.json())
                .then(data => {
                    // do whatever you want with the data
                        if(data.result=="success"){
                            var row=document.getElementById("hourstable").insertRow(1);
                            row.setAttribute("rowid",data.id);
                            row.innerHTML="<td><span class='deleterecord'>✖</span></td><td>"+nicedate(data.date)+"</td><td><span class='hours'>"+hours+"</span><input class='edithours' type='time' step='60' /></td><td><div class='description'>"+description.replace(/\n/g,"<br>")+"</div><textarea class='editdescription'><textarea></td><td><button class='editbutton'>Edit</button><button class='cancelbutton'>Cancel</button><button class='savebutton'>Save</button></td>";
                        }
                        document.getElementById("hoursinput").value="00:00";
                        document.getElementById("description").value="";
                        document.getElementById("submithours").disabled = false;
                        document.getElementById("submitform").style.display="none";
                        makelinksclickable();
                });
            });
        });
    }
});
We create an event listener listening for when the button with ID "submithours" is clicked. We disable the button so it can't be accidentally clicked multiple times. We set variables with the contents of the time and description. We then calculate the number of total minutes to put into the database, multiplying hours by 60 and adding to the minutes to get the total minutes. If the number of hours is "00:00" then we alert the error to the user that they need to have more than 0 minutes. If there is no error, then we go further. We do a fetch of our PHP file like before, but now we need to modify our header to let the browser know we are going to send data along with our request. Our data will be in JSON format with the total minutes and description. The data is passed in the "body" attribute of the call. Let's now look at the add_record.php file.
<?php
    $servername = "sql110.infinityfree.com";
    $username ="if0_37169177";
    $password = "*****************************";
    $dbname = "if0_37169177_hour_tracker";
    $conn = new mysqli($servername,$username,$password,$dbname);
    $postedData = json_decode(file_get_contents('php://input'), true);
    $stmt=mysqli_prepare($conn,"INSERT INTO coding_hours (date,minutes,description) VALUES(?,?,?)");
    mysqli_stmt_bind_param($stmt,"sss",$date,$minutes,$description);
    $minutes=$postedData['minutes'];
    $description=$postedData['description'];
    $date=gmdate("Y-m-d H:i:s");
    mysqli_stmt_execute($stmt);
    $last_id = $conn->insert_id;
    echo("{\"result\":\"success\",\"id\":\"".$last_id."\",\"date\":\"".$date."\"}");
    $conn->close()
?>
We connect to our database like before, but now in line 7 we are getting the data that was passed to the browser. From this we get our $minutes and $description variables. Now in line 8 we "INSERT INTO" our database and we prepare the values that will go into our database. We are using "mysqli_prepare" so we can SAFELY pass data into the database.
If you simply take data from a user without preparing it, this can be a way for malicious users to do very bad things to your database. For example, if we let a user type in something like a Description and then we told MySQL to simply run that text through the database, the user could type in something like:
Robert'); DROP TABLE StudentsMySQL would insert "Robert", but then delete a table called "Students". This is not the behavior we want. So we have to prepare the data we are getting from users and then safely run that through our database.
Our $date variable is the current date and time. And we execute the database command. Then we get the most recent ID for our new row (which was automatically incremented from the last one). And we pass data back to our JavaScript in JSON format to let it know that the command ran successfully and we tell it the ID of the new row so it can put the correct Delete and Edit buttons on the screen. Our web page already knows the data the user submitted so our JavaScript is able to add the new row to the table.
Our PHP files for updating and deleting data in the database are very similar but they use the MySQL UPDATE and DELETE commands.
Conclusion
So that's it! We can now create extremely powerful websites that let our users work with data. One thing to note, we have not implemented authentication so anyone coming to our page can interact with our data. We might want to lock this down in a real project.
We could also improve this site by turning on HTTPS. It's simple to do in the Infinity Free control panel. You could also buy your own custom domain and point this web site to it. Good luck on your journey!
How did you like this tutorial? Do you feel inspired to go learn how to work with data? No matter what database or language you are using for your project, the basic principles will be the same.
