


CSS
This is the second in a three-part series covering the basic building blocks of web pages: HTML, CSS, and JavaScript. Learn about HTML first. Learn about JavaScript next.
This lesson on CSS is meant for people who need a really fast lesson only covering the basics of CSS. It is not all comprehensive, but instead gives you only the basics that you need to get started working with it. Any kinds of tools made today to get the widest audience will need to presented inside web pages or apps. Thus you should know some CSS. Knowing how web pages basically work will help you in designing tools that automate managing data from the web.
CSS stands for Cascading Style Sheets. It's a set of properties that can be applied to HTML elements to stylize them visually. HTML was created as a basic way to organize documents on the Internet and to tell the browser how to display documents. Users could stylize some HTML elements in very rudimentary way, but early web pages definitely did not prioritize visual beauty in the beginning. Web pages were made first for utility, not for beauty. CSS was later develped to change all that.

Sample CSS
CSS can be placed into a web page to modify the visual style of HTML elements in multiple ways. Because the same element could be modified multiple times by different CSS properties and values, whenever there is a conflict, CSS takes a "cascading" approach. It's not as straightforward as figuring out the order of which property was called first. There is a cascading algorith that takes into account: 1) Relevance, 2) Origin and importance, 3) Specificity, and 4) Order of appearance. You don't need to memorize this, just be aware. If you absolutely want your CSS to have precedence and it's not for some reason, try adding "!important" to the end of the line and it should get priority.
CSS can be added in multiple ways. The easiest way is to add it inline inside an HTML tag using the "style" property. Like so:
<body style="background-color:green;"></body>The body of our web page will have a green background color. Colors can be specified by a list of common color names, but usually we see colors specified in RGB (red, green, blue) in hexadecimal. Hexadecimal digits go from 0-15 (16 possible values) using the characters 0-9 and A-F. For example, #000000 is black. It literally means to have 0 red, 0 green, and 0 blue. When we turn these all to the maximum, #FFFFFF, we get the color white. #FF0000 is the color red since we have the maximum amount of red and zero of the other colors. There are multipe web sites and tools that will help you get the code for a certain color. Find the colors that you like on a web site. You can right-click on the page and choose "Inspect". In the developer panel that opens on the right select the "Elements" tab. Select the element that interests you and you can see its CSS properties in the Styles tab. Find its color or background-color and you can see its color code.
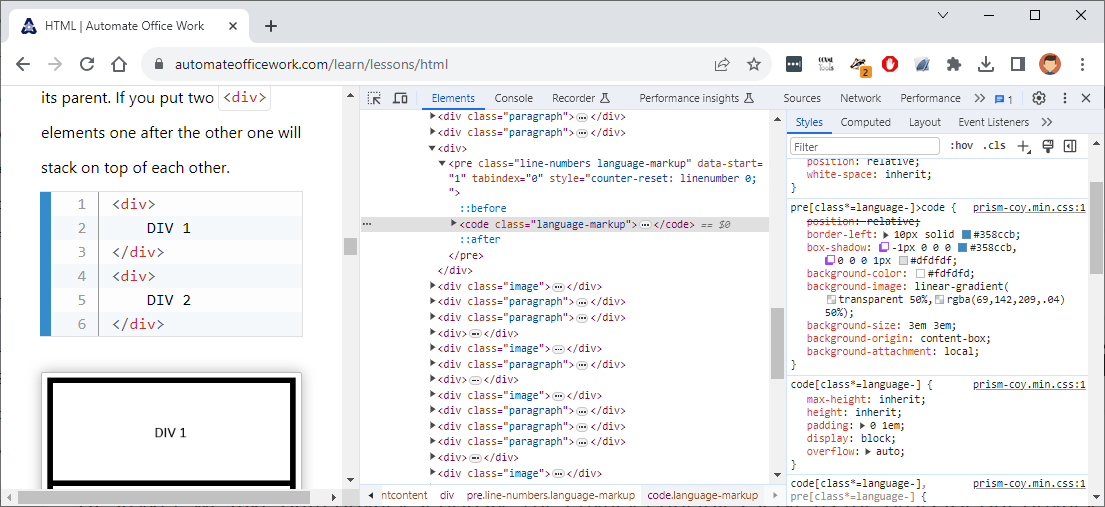
Do you like the bright shade of blue used to the left of code samples and you want to know its hexadecimal value? Look at the HTML elements CSS. Open the Elements tab and then the Styles tab to the right of that. Here you see the "border-left" value is set to 10px solid #358CCB.
Another way to insert CSS into an HTML page is to use the
<style></style> tag. This can be anywhere in your HTML, but it's most often found in the <head> section of the web page. Like below:<html>
<head>
<style>
body{
background-color:green;
}
</style>
</head>
<body></body>
</html>Simply type the name of an HTML element to select it and specify the properties you want to modifty inside curly braces after it. You can also chain elements together if you want to only modify HTML elements that are the children of another element. For example,
<style>
    div div{
        background-color:green;
    }
</style>
only modifies a
<div></div> element that is inside another <div></div> element. It doesn't matter how many other layers of elements may be between these two <div></div> elements.If you only want to modify
<div></div> elements that are direct children of a <div></div> element, then we use a greater than sign between them, like this:<style>
div>div{
background-color:green;
}
</style>We can also select HTML elements that are the first child of their parent or the last child, like this:
<style>
    div>div:first-child{
        background-color:green;
    }
    div>div:last-child{
        background-color:red;
    }
</style>
Or perhaps you only want the fourth child.
<style>
    div>div:nth-child(4){
        background-color:green;
    }
</style>
Or perhaps even and odd children
<style>
    div>div:nth-child(odd){
        background-color:green;
    }
    div>div:nth-child(even){
        background-color:red;
    }
</style>
You can also do something more complicated. Like every third one starting from the second:
<style>
    div>div:nth-child(3n+1){
        background-color:green;
    }
</style>
You can also take the opposite by adding :not.
<style>
    div>div:not:first-child{
        background-color:green;
    }
</style>
We can also add events to the end of a selector so the style is only modified, say when the user hovers over the element.
<style>
    div>div:not:first-child:hover{
        background-color:green;
    }
</style>
Hover is the most common event and likely the only one you will need to know.
Another way to select a set of HTML elements is with square brackets. In our HTML lesson there was an element
<input type="text" /> for a short one-line text box and a similar one <input type="checkbox" /> for a checkbox. If you only want to select one of these <input /> elements to modify, you can select it like this:<style>
input[type=text]{
background-color:green;
}
</style>These are called CSS attribute selectors and can be made more complex. *= means it contains the following string. ^= means it begins with the following string. input[type] means any input element that has a type attribute. $= means it ends with the following string. You don't need to memoize these. Just remember you can use more complexity if you need to.
Now that we have all the basic CSS selectors out of the way, there are two main ones that you will see a lot. These are ID and class. An HTML element can have an ID or a class property or both. An ID element is meant to uniquely identify the element and must be unique.
<div id="div1"></div>.A class on the other hand identifies a group of elements that all belong to the same group.
<div id="div1" class="box"></div>
<div id="div2" class="box"></div>
<div id="div3" class="box"></div>
We can apply a CSS style to each
<div></div> individually or all together as a single group.<style>
#div1{
background-color:red;
}
#div2{
background-color:green;
}
#div3{
background-color:blue;
}
.box{
height:20px;
width:20px
}
</style>You select an element by ID with the # sign followed by the ID. You select a group of elements by class with a period followed by the class name. These can be combined like this:
<style>
    #div1.box{
        background-color:red;
    }
</style>
Meaning only make the background-color red if the HTML element with an ID of "div1" also has a class of "box".
You now have the basics of CSS selectors down. Now it's time to talk about properties. There are many, many CSS properties, but the main ones have to do with size, position, color, space around and space inside, visibility, font family, font size and text alignment.
The height and width of an element is often specified
This is the second in a three-part series covering the basic building blocks of web pages: HTML, CSS, and JavaScript. Learn about HTML first. Learn about JavaScript next.